The web app we will make is about predicting the image of a hand sign digit. The model is trained on the dataset named “American Hand Digit Sign Language” found on Kaggle.
This tutorial will focus on making a web app using the Flask web framework, so all the necessary backend processes, including data preparation, data preprocessing, and training a model, are already done.
We will implement our model in action by embedding it on the client side.
Overview
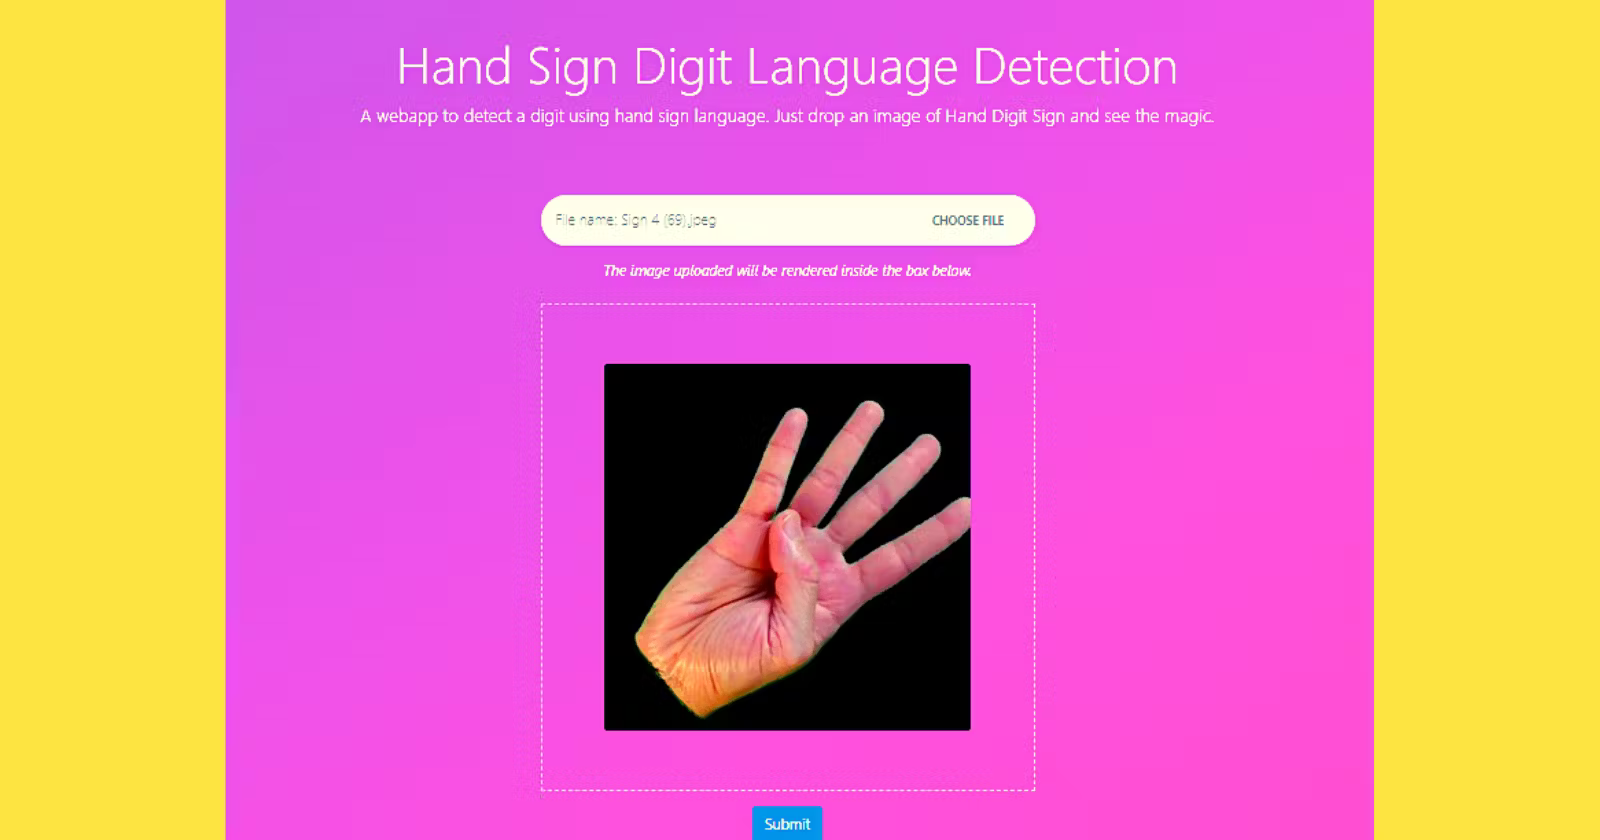
The web app has a good-looking user interface in which we have an image upload area and an image preview section where we can see the preview of the uploaded image. All were made using Bootstrap, CSS, and JS. The web app has a Submit button responsible for handling the prediction and rendering the prediction page, where we will see the result obtained by predicting the image using our custom model.
We used Bootstrap to build our client interface and to preview the image the user will upload, we used custom CSS and JS, and we used Keras, NumPy, and Pillow to recognize and predict the image in the backend.
Dependencies
We need the following dependencies to get started on this project.
Flask
TensorFlow (Keras)
NumPy
Pillow (PIL)
Installing the dependencies
We need to install the dependencies we’ve seen above. Open your terminal and run the following command to install the libraries using the pip.
PowerShell
1
pip install Flask tensorflow numpy Pillow
The command will begin installing the libraries in your base Python environment. If the libraries have already been installed in your environment, then the command will upgrade the libraries to the updated version or prompt the message stating requirements are already satisfied.
However, it is recommended that you use virtual environments that keep the libraries in an isolated Python environment, avoiding conflict between the different versions of the same dependencies so that your other projects might not get affected due to the change in dependency version.
To create a Python virtual environment, see the detailed guide below.
After successfully setting up the virtual environment in the project directory and installing the required dependencies, move on to the coding part.
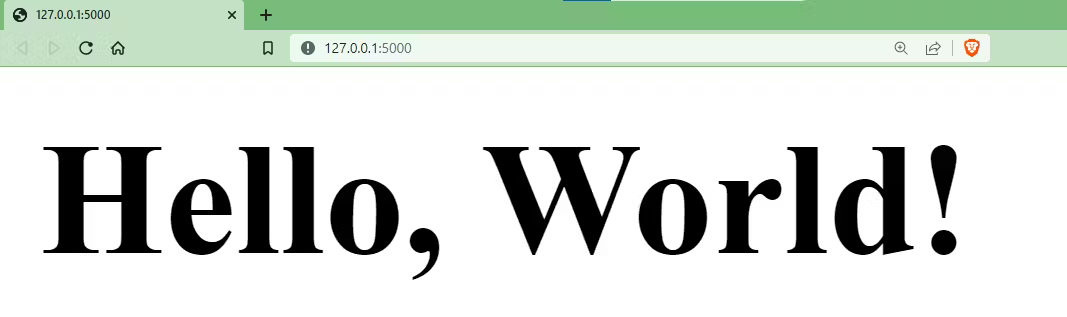
Creating a Flask server
We’ll create a basic Flask server to start our web app on the localhost with default port number 5000.
In the root folder of the project directory, create a file named app.py and add the following code to start a Flask server.
Python
1
2
3
4
5
6
7
fromflask importFlask
app=Flask(__name__)
@app.route('/')
defhello_world():
return'<h1>Hello, World!</h1>'
To run the app, open your terminal and change the directory to the project directory, or open the terminal integrated with the IDE (PyCharm) or code editor (VS Code) and execute the following command.
PowerShell
1
>flask--app app.py run
Learn how to run the flask apps from the terminal. The following guide will help let you know the usage of the flask run command with different flags.
This will start our development server on the localhost with port number 5000, and we can access the web app on the web address http://127.0.0.1:5000.
Our Flask app is ready, and we’ll start structuring our app into a good web app. But first, we’ll have to code our backend.
Coding the backend
Before coding our user interface, we’ll need to create the functions which will handle the preprocessing of the uploaded image and the prediction on that uploaded image.
Create a Python file named model.py where all our functions to handle the image preprocessing and prediction will go.
First, we imported the libraries we will use further in the code.
load_model from keras.model will be used to load the model.
img_to_array from keras.utils will be used for converting the image into an array.
numpy is used for converting images into an array, but we’ll use it in the prediction function.
Image from PIL (Python Imaging Library) will be used for loading the image.
In the next section, we loaded our model using the load_model function, specified the path of our trained model inside it, and stored it in the variable named model.
Then, we defined the function to preprocess the image, which takes the path of an image, and then we loaded that image using the Image.open function. Then we resized the loaded image into 224 x 224 dimensions because we trained our model using the transfer learning technique. The MobileNet model we used for transfer learning is pre-trained with the images having 224 x 224 dimensions. Then we created the array of that resized image and, by dividing it by 255.0, we converted the image pixel range from 0 to 1, then reshaped it to the required shape and returned it.
In the end, we created a function to predict the result of the preprocessed image using our model.
Coding the frontend
The backend part is completed. Now we’ll code the frontend part of our web app. In the app.py file, add the following code.
Initially, we imported the required libraries and functions to help us advance in this code.
Flask will be used to create or serve our application.
render_template will be used for rendering our HTML files.
request for accessing the image uploaded by the user in the frontend of our application.
preprocess_img and predict_result are the functions we created in our model.py file.
After that, we created the home route where we defined the decorator @app.route("/") with path (/) and the function main to render the HTML template index.html.
The index.html file includes the web app’s user interface, which has a form for uploading the image, an image preview section, and a submit button.
Add the HTML files in the Flask application. Create a folder named templates in the root folder of the directory and then create the files named layout.html and index.html.
In the image upload section, we added the URL that will handle the image uploading, preprocessing, and prediction. Additionally, we added the method='post' to handle the POST request. We will define the logic for predict_image_file ahead of this tutorial.
Now, add the custom CSS and JS files that will add the style and function to preview the uploaded image by the user.
Create a folder name static in the root folder of the project directory and then create the subfolders css and js inside the static folder and then add the custom.css and image_upload.js files, respectively.
In this section of the app.py file, we created the prediction route using the decorator @app.route('/prediction', methods=['POST']) in which we specified the path /prediction and set the method to POST to handle the post request.
Then defined, the function predict_image_file in which the code takes the image stream of the image uploaded by the user and performs the preprocessing using the function preprocess_img, which is coming from the model.py file and then predicts the result using the predict_result function and then ultimately rendered the result.html page where we can see the result.
To avoid any error, we wrapped the code in the try-except block, in which if the user uploads a file that cannot be processed, then the code will show the error in the frontend.
To add the result page, create a file named result.html in the templates folder and add the following HTML.
result.html
result.html
XHTML
1
2
3
4
5
6
7
8
9
10
11
12
13
14
15
16
17
18
19
20
21
22
23
{%extends"layout.html"%}
{%blocktitle%}
Prediction-HandSignDigitRecognition
{%endblock%}
{%blockcontent%}
<div class="container py-5">
<header class="text-white text-center">
<h1 class="display-4">Hand Sign Digit Language Detection</h1>
<p class="lead mb-5">You will see the prediction of the input image.</p>
This page is responsible for displaying the prediction if the image uploaded by the user is processed successfully. Otherwise, the error message will be displayed.


