

Developers associated with data science or machine learning probably have web development skills. So they use a framework called Streamlit as a frontend source to serve their ML or Data Science web app.
Streamlit is an open-source, accessible, and straightforward Python framework that allows us to create interactive UI for dashboards, Machine Learning, Data Visualization, and Data Science projects.
Anyone with no experience in web development can generate an app using Streamlit though it requires some basic knowledge of Python. Data Scientists and Data Engineers often use Streamlit.
Generating an app using Streamlit is achieved by adding a few streamlit function calls to the existing Python projects. Check out this article on EDA and the data visualization web app using Streamlit to learn how to build the frontend for your Python project using Streamlit.
Once you’ve created an app, you probably want your project to be on the cloud so others can utilize it.
In this tutorial, we will discuss how we can deploy the Streamlit application to Heroku, a platform as a service (PaaS) allowing us to host our applications entirely on the cloud.
Creating a Streamlit Application
To deploy an app on Heroku, we need it first. I’ve previously created a Streamlit app “Python: Web app under 100 lines of code using streamlit” and explained the process of making it in an article, but I haven’t covered the deployment process. So we’ll use that app and deploy it on Heroku.
|
1 2 3 4 5 6 7 8 9 10 11 12 13 14 15 16 17 18 19 20 21 22 23 24 25 26 27 28 29 30 31 32 33 34 35 36 37 38 39 40 41 42 43 44 45 46 47 48 49 50 51 52 53 54 55 56 57 58 59 60 61 62 63 64 65 66 67 68 69 70 71 72 73 74 75 76 77 78 79 80 81 82 83 84 85 86 87 88 89 90 91 92 93 94 95 96 97 |
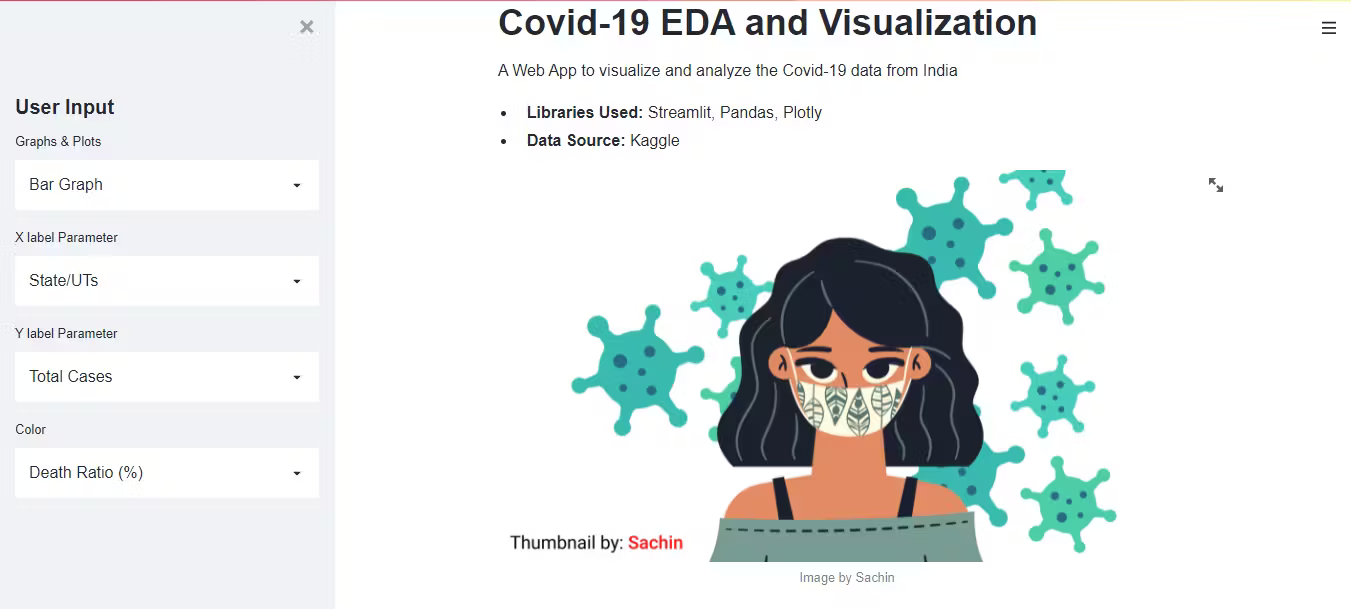
# Importing necessary libraries import streamlit as st import pandas as pd import plotly.express as px st.title("Covid-19 EDA and Visualization") st.markdown(''' A Web App to visualize and analyze the Covid-19 data from India * **Libraries Used:** Streamlit, Pandas, Plotly * **Data Source:** Kaggle ''') # Inserting Image st.image('Covid-Banner.png', caption="Image by Sachin") # Reading csv data data = pd.read_csv('Covid-19.csv') # Displaying Data and its Shape st.write("**Covid-19 dataset**", data) st.write("Shape of data", data.shape) # Header of sidebar st.sidebar.header("User Input") # Creating selectbox for Graphs & Plots graphs = st.sidebar.selectbox("Graphs & Plots", ("Bar Graph", "Scatter Plot", "HeatMap", "Pie Chart")) # Sorting the columns index = sorted(data.columns.unique()) # Setting default value for x, y, and color default_index_x = index.index('State/UTs') default_index_y = index.index('Total Cases') default_index_col = index.index('Death Ratio (%)') # Creating selectbox for x, y and color label and setting default value x_label = st.sidebar.selectbox("X label Parameter", index, index=default_index_x) y_label = st.sidebar.selectbox("Y label Parameter", index, index=default_index_y) col = st.sidebar.selectbox("Color", index, index=default_index_col) st.markdown(''' ## **Visualization** ''') # Caching the function @st.cache(suppress_st_warning=True) # function to plot graphs def visualize_plotly(graph): if graph == "Bar Graph": st.write(graph) fig = px.bar(data, x=x_label, y=y_label, color=col) elif graph == "Scatter Plot": st.write(graph) fig = px.scatter(data, x=x_label, y=y_label, color=col) elif graph == "HeatMap": st.write(graph) fig = px.density_heatmap(data, x=x_label, y=y_label, nbinsx=20, nbinsy=20) else: st.write(graph) fig = px.pie(data, values=x_label, names=data[y_label]) return fig figure = visualize_plotly(graphs) st.plotly_chart(figure) st.markdown(''' ## **Report** ''') # Creating buttons to display reports if st.button("Highest Cases"): st.header("Highest Cases in a State/UT") highest_cases = data[data['Total Cases'] == max(data['Total Cases'])] st.write(highest_cases) if st.button("Lowest Cases"): st.header("Lowest Cases in a State/UT") lowest_cases = data[data['Total Cases'] == min(data['Total Cases'])] st.write(lowest_cases) if st.button("Highest Active Cases"): st.header("Highest Active Cases in a State/UT") high_active_cases = data[data['Active'] == max(data['Active'])] st.write(high_active_cases) if st.button("Lowest Active Cases"): st.header("Lowest Active Cases in a State/UT") low_active_cases = data[data['Total Cases'] == min(data['Total Cases'])] st.write(low_active_cases) if st.button("Highest Death Ratio (%)"): st.header("Highest Death Ratio (%) in a State/UT") high_death = data[data['Death Ratio (%)'] == max(data['Death Ratio (%)'])] st.write(high_death) if st.button("Lowest Death Ratio (%)"): st.header("Lowest Death Ratio (%) in a State/UT") low_death = data[data['Death Ratio (%)'] == min(data['Death Ratio (%)'])] st.write(low_death) |
Creating Required files
We need to add some files in the app’s root directory that allow Heroku to install the requirements and run the application.
requirements.txt file
The requirements.txt file contains all the libraries that are used in the project or need to be installed for the project to work. We can create it manually or use a Python library called pipreqs which will automatically create a requirements.txt file.
To generate a requirements.txt file.
|
1 |
pipreqs <project-directory-path> |
The requirements file should look something like the following:
|
1 2 3 |
pandas==1.4.3 plotly==5.10.0 streamlit==1.12.0 |
setup.sh and Procfile
setup.sh and Procfile is used to tell Heroku the needed commands for running the application.
In the setup.sh file, we’ll add the following code that creates a streamlit folder with a credentials.toml and a config.toml file.
setup.sh file
|
1 2 3 4 5 6 7 8 9 10 11 12 13 |
mkdir -p ~/.streamlit/ echo "\ [general]\n\ email = \"your-email@domain.com\"\n\ " > ~/.streamlit/credentials.toml echo "\ [server]\n\ headless = true\n\ enableCORS=false\n\ port = $PORT\n\ " > ~/.streamlit/config.toml |
Now we’ll create a Procfile that specifies the commands executed by the app on the startup.
In the command below, Procfile executes the setup.sh file and then calls streamlit run to run the application.
Procfile file
|
1 |
web: sh setup.sh && streamlit run app.py |
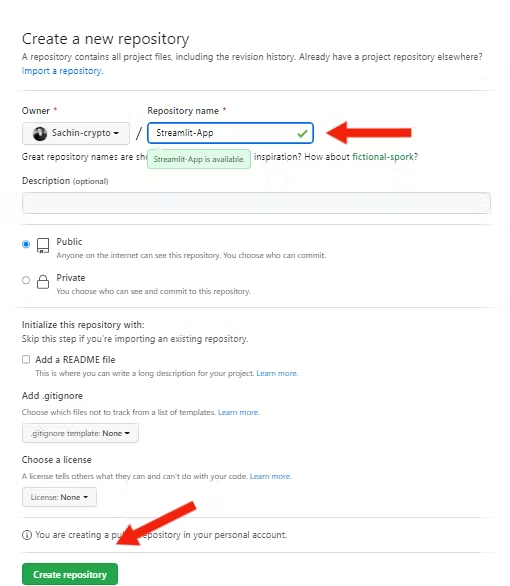
Creating a GitHub repository
Now, it’s time to push the code to GitHub. If you haven’t created a GitHub repository, then log in to your GitHub account and follow the steps below:
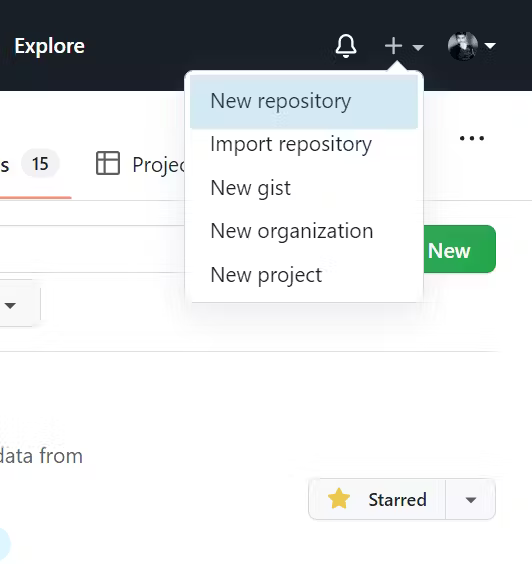
Type the repository name and hit the “Create repository” button.
Now that you’ve created a GitHub repository, it’s time to commit and push the code to the repository. Move to the app.py directory and copy-paste the following command into your terminal.
|
1 2 3 4 5 6 7 |
echo "# Streamlit-App" >> README.md git init git add . git commit -m "first commit" git branch -M main git remote add origin https://github.com/your-github-username/repository-name.git git push -u origin main |
Here, a git repo will be initialized in the current directory, and instead of adding git add README.md, we’re running git add . to stage all the files in our current directory.
Deploying to Heroku
We need a Heroku account to deploy any application on their platform. In general, Heroku is free to use but to get more features, we’ll have to pay.
Creating a Heroku account
To create an account on Heroku, click here. I’ve already created an account, so I’ll log in to my account.
There are two methods to deploy applications on Heroku:
- Using Heroku UI (Manually)
- Using Heroku CLI
Using Heroku UI (Manually)
Using Heroku UI, we can manually deploy our application by performing the below steps.
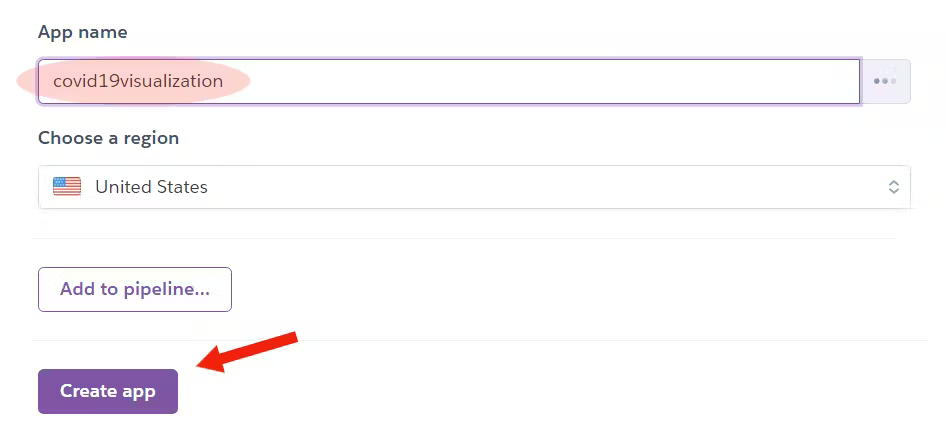
Click on the “Create new app” to create a new app.

Then enter the name of the app and then hit “Create app” to move on to the next step.
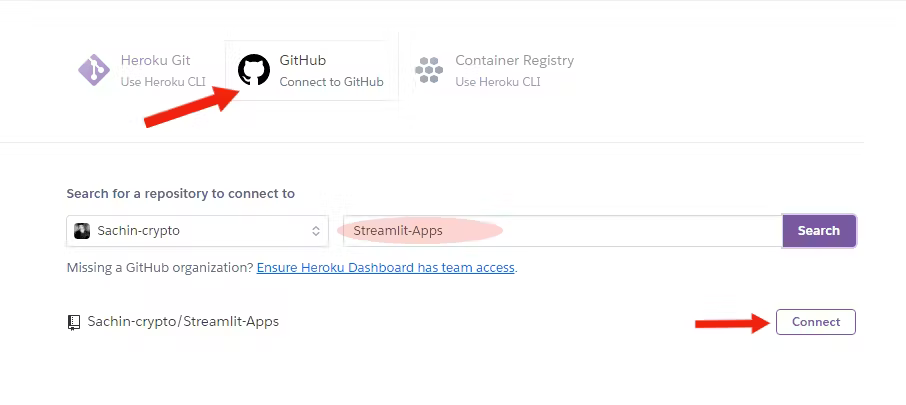
Click on the “GitHub” option to connect to GitHub on Heroku, search for application repository, and hit “Connect“.
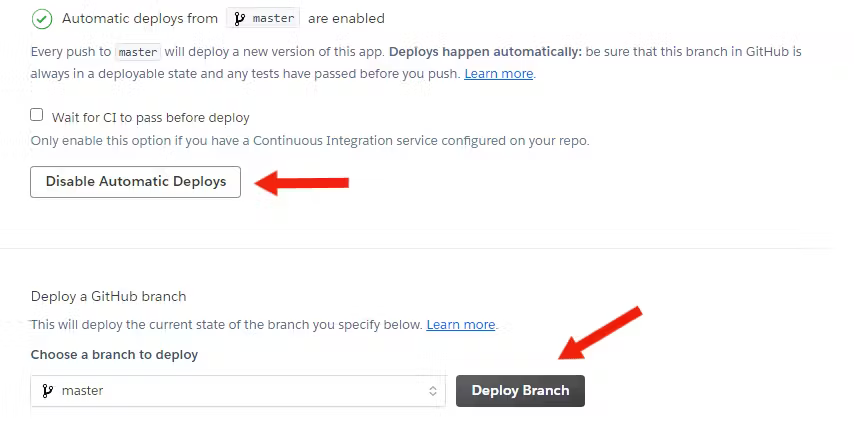
In the last step, click “Enable Automatic Deploys“, select the branch, and hit “Deploy Branch“.
Now, wait until Heroku completes the build process of our application and deploys it on the cloud. After completing the deployment process, we can see our application live on the cloud. Here you can see the application covid19visualization.
Using Heroku CLI
To deploy our application on Heroku from the terminal, we need to download the Heroku CLI. Heroku CLI requires Git. If you haven’t installed it yet, then complete the Git installation or refer to this article on Getting Started on Heroku with Python.
Log in to Heroku
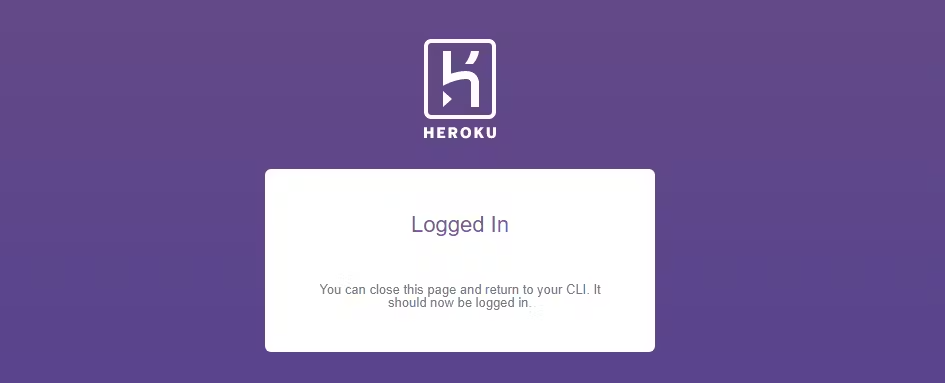
After setting up the Heroku CLI, we can log in to the Heroku account. Open your terminal, move to the app.py directory, and run the heroku login command. You will be asked to press any key, redirecting you to the Login window.
|
1 2 3 4 5 |
PS D:\SACHIN\VS_projects\streamlit\Covid-19_EDA App> heroku login heroku: Press any key to open up the browser to login or q to exit: Opening browser to https://cli-auth.heroku.com/auth/cli/browser/1f44be15-907a-4c85-8490-9f6f66e5830e?requestor=SFMyNTY.g2gDbQAAAA4xNTcuMzcuMTU2LjEyMm4GAEjfTbaCAWIAAVGA.ja9bfS30WQXj7SoiyTzMwxN6Ryvo3RSJF4BhaPWqe8o Logging in... done Logged in as <your-username> |
Deploying the app
After the log-in process, we need to create a Heroku instance for the app by using the command heroku create in the terminal.
|
1 |
heroku create <your-app-name> |
It’s your choice to type a name for your app otherwise just run the heroku create command.

Push the code using the following command to that instance.
|
1 2 3 |
git add . git commit -m "commit message" git push heroku master |
After running the command git push heroku master, Heroku will automatically detect that it is a Python app and installs the packages from the requirements.txt file. After completing the build process, we can see the following log in the terminal.
|
1 2 3 4 5 6 7 8 9 10 11 12 13 14 |
remote: -----> Discovering process types remote: Procfile declares types -> web remote: remote: -----> Compressing... remote: Done: 142.4M remote: -----> Launching... remote: https://covid19visualization.herokuapp.com/ deployed to Heroku remote: This app is using the Heroku-20 stack, however a newer stack is available. remote: To upgrade to Heroku-22, see: remote: https://devcenter.heroku.com/articles/upgrading-to-the-latest-stack remote: remote: Verifying deploy... done. To https://git.heroku.com/covid19visualization.git * [new branch] master -> master |
This app is using the Heroku-20 stack which is an old stack, however, we can upgrade to Heroku-22 which is a newer stack. Here’s how to upgrade an app stack.
Checking if the app is running
Now we can check if our app is deployed successfully and running on the web using heroku ps:scale web=1.

Finally, run the command heroku open and this will open the app using your default browser, or manually enter the app’s URL in the browser to open the application.
Visit my GitHub repository for Source Code.
Conclusion
We’ve learned how to deploy a Streamlit app on Heroku using two methods.
The first method we used is Heroku UI or manually deploying our app from the Heroku website by performing some simple steps.
The second method we used is Heroku CLI, Heroku Command Line Interface helps us perform the deployment process completely from the terminal.
That’s all for now.
Keep Coding✌✌.


