
In this tutorial, we’ll look at how to use FastAPI to display static and dynamic images on the frontend.
Displaying images on the frontend can be a time-consuming operation; it takes a significant amount of time and effort to create logic to show static and dynamic images. FastAPI includes certain classes and modules that can help you save time and effort when displaying images.
Displaying static images
If you’ve dealt with the Python Flask or Django web frameworks, you’ll know that in order to serve static files, we need to include them in the static folder established within the project’s root directory.
The procedure is the same, however, the logic for displaying static images in FastAPI differs.
The following code will help us to display the static images on the frontend.
|
1 2 3 4 5 6 7 8 9 10 11 12 13 14 15 16 17 18 19 20 21 22 |
# static_img.py from fastapi import FastAPI from fastapi.responses import HTMLResponse from fastapi.staticfiles import StaticFiles app = FastAPI() app.mount("/imgs", StaticFiles(directory="imgs"), name='images') @app.get("/", response_class=HTMLResponse) def serve(): return """ <html> <head> <title></title> </head> <body> <img src="imgs/g.png"> <h1>Hello World</h1> </body> </html> """ |
To serve static images or files, we utilized FastAPI’s StaticFiles class. This class is derived directly from Starlette; we can simply import that class from fastapi.staticfiles instead of starlette.staticfiles for convenience.
We stored our static image inside the imgs directory present in the root directory and we passed this directory to the StaticFiles() instance and mounted it in the /imgs path.
Mounting here means setting up or adding a completely independent application in a specific path, which will then take care of handling all the sub-paths.
Here,
/img – is a sub-path on which the sub-application will be mounted.
directory='img' – refers to the static directory where our static images or files will be stored.
name='images' – this name will be used by FastAPI internally or we can skip this also.
The path operation decorator @app.get("/", response class=HTMLResponse) was then created, and you’ll notice that we passed HTMLResponse, which will assist in returning the HTML response directly from FastAPI.
The response_class will also be used to define the media type of the response and in this case, in the HTTP header, Content-Type will be set to text/html.
Then we created a path operation function called serve() and returned the HTML in which we passed our static image path("imgs/g.png") in the src attribute of the <img> tag.
Now run the server using the uvicorn.
|
1 |
uvicorn static_img:app --reload |
Here’s the API response
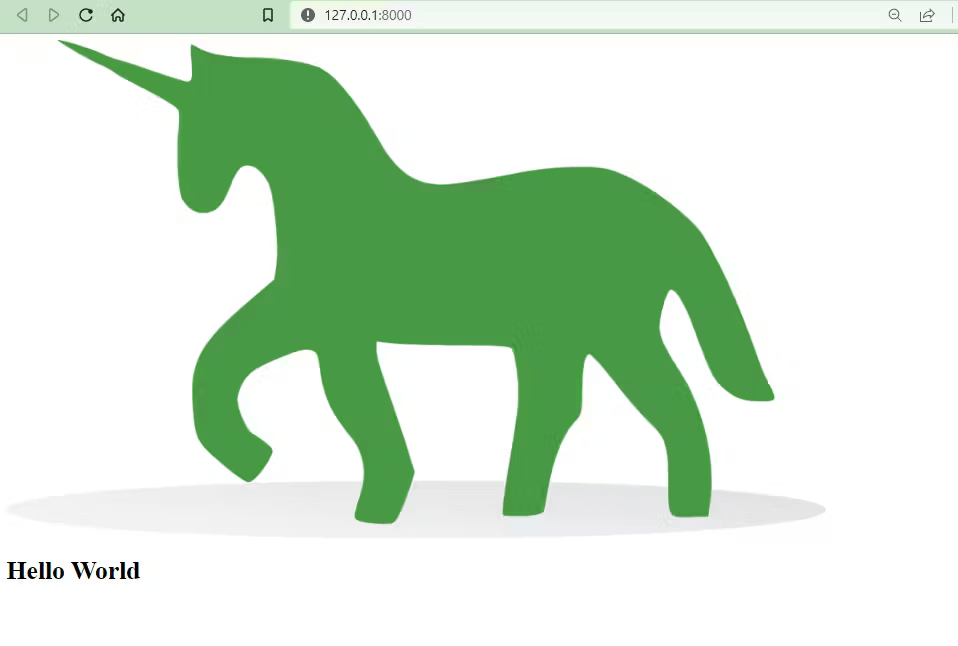
If we see the API response in the Postman, then we’ll see a raw HTML as a response by the FastAPI.
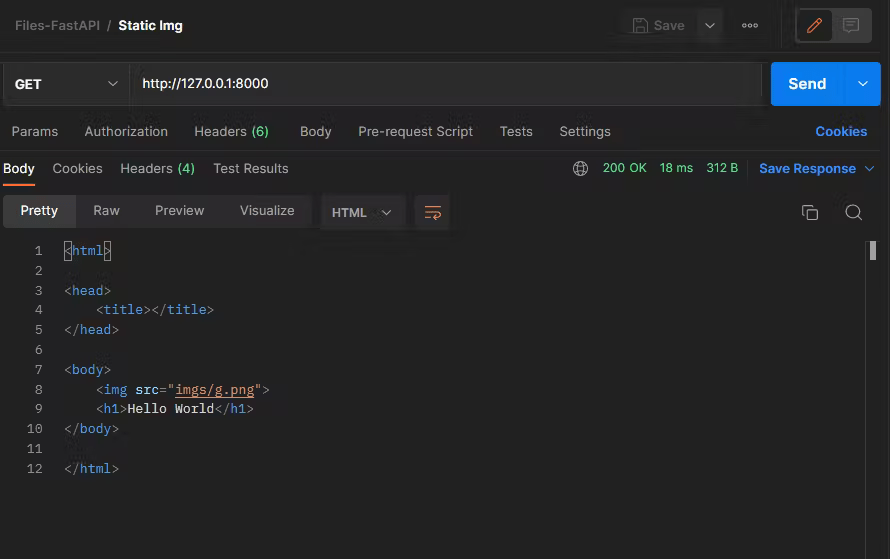
Due to HTMLResponse in the path operation decorator, the browser parses our HTML like it usually does for any HTML file.
Another approach
This approach might be beneficial if you are working on a serious project and want your code to be more readable and manageable.
In this approach, we’ll be using Jinja, and instead of using HTMLResponse we’ll be using Jinja2Templates to render the HTML response.
In order to use the
Jinja2Templates, we need to install thejinja2library and it can be installed using the pip by running the commandpip install jinja2.
|
1 2 3 4 5 6 7 8 9 10 11 12 13 14 15 16 |
# files.py from fastapi import FastAPI, Request # The modules are directly coming from starlette from fastapi.staticfiles import StaticFiles from fastapi.templating import Jinja2Templates app = FastAPI() app.mount( "/static", StaticFiles(directory="static"), name="static") templates = Jinja2Templates(directory="templates") @app.get("/") def static(request: Request): return templates.TemplateResponse("index.html", {"request": request}) |
The process is pretty much similar to the first approach but in this approach, we imported some more classes such as Request and Jinja2Templates from the fastapi and fastapi.templating modules, respectively.
Like in the first approach, we mounted the StaticFiles(directory="static") instance in a path /static.
Then using the Jinja2Templates(directory="templates"), we specified the directory called templates from where the FastAPI will look for the .html files and stored them inside the templates variable.
Then we created the path operation decorator @app.get("/") and followed by it created the path operation function called static and passed the Request class to the parameter request.
Then we returned the TemplateResponse("index.html", {"request": request}). In this case, we passed the request as part of the key-value pairs in the Jinja2 context. This will allow us to inject the dynamic content that we desire when the template is rendered.
Now write HTML code in the index.html file inside the templates directory.
|
1 2 3 4 5 6 7 8 9 10 |
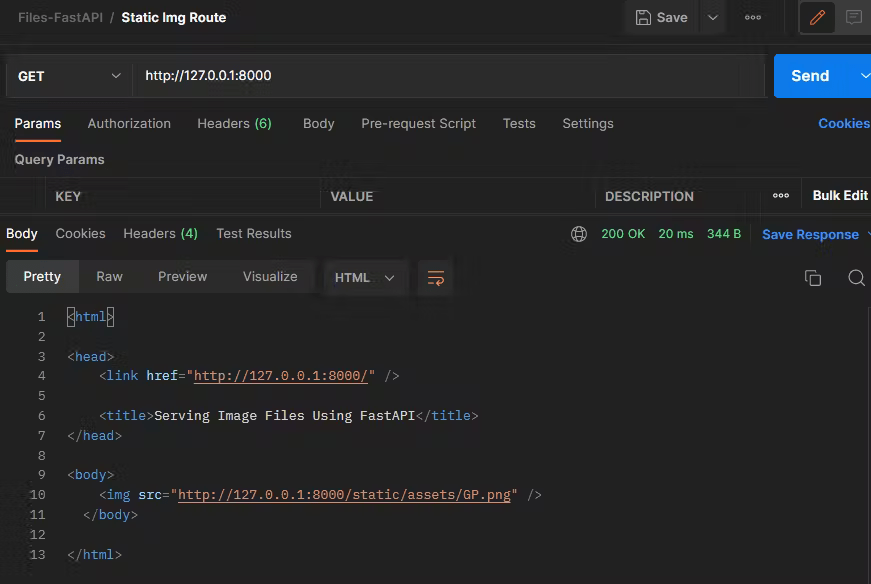
<html> <head> <link href="{{ url_for('static') }}" /> <title>Serving Image Files Using FastAPI</title> </head> <body> <img src="{{ url_for('static', path='assets/GP.png') }}" /> </body> </html> |
Just add the code <link href="{{ url_for('static') }}" /> to link the directory named static as shown in the above code.
Then in the src attribute of the <img> tag, we specified the path to the static image using jinja like this {{ url_for('static', path='assets/GP.png') }}.
Now run the server using the command uvicorn files:app --reload.
Here’s the response
If we see what we get when we send the request to the API using Postman.
We can include the same HTML as above in our index.html and get the same result but it won’t be a good practice at all.
Serving user-provided images
In this approach, we’ll have a form where the user can enter an image that will be displayed on the frontend.
When a user uploads an image file, it is sent as form data, and we must install the following library to receive it.
|
1 |
pip install python-multipart |
The following code will be responsible for uploading and displaying the user-provided image.
|
1 2 3 4 5 6 7 8 9 10 11 12 13 14 15 16 17 18 19 20 21 22 23 |
# dynamic.py from fastapi import FastAPI, UploadFile, File, Request from fastapi.templating import Jinja2Templates import base64 app = FastAPI() templates = Jinja2Templates(directory="templates") @app.get("/") def dynamic_file(request: Request): return templates.TemplateResponse("dynamic.html", {"request": request}) @app.post("/dynamic") def dynamic(request: Request, file: UploadFile = File()): data = file.file.read() file.file.close() # encoding the image encoded_image = base64.b64encode(data).decode("utf-8") return templates.TemplateResponse( "dynamic.html", {"request": request, "img": encoded_image}) |
The class UploadFile and function File from fastapi were imported into the code above to assist in handling the reading and uploading of the image file. We imported the base64 library to handle image encoding and decoding.
We created a path operation decorator (@app.get("/")) and right below it created a path operation function called dynamic_files that will render the dynamic.html file on the path "/".
Then we created a path operation decorator(@app.post("/dynamic")) to handle the Post request and then we created a path operation function called dynamic and passed request: Request and file: UploadFile = File(). Then we read the image file and stored it inside the data variable and finally closed the file.
Here, file.file.read() is equivalent to UploadFile.file.read(). UploadFile has a file attribute which is a file-like object and read() is a method also provided by UploadFile to read the bytes/characters of the image.
If we would have defined the asynchronous path operation function, then we could read the file using
await file.read().
Now we’ve read the bytes of the image file and it needs to be encoded in a string that can be returned and passed to the template. If we look at the image’s bytes, it would look like the following.
|
1 2 3 |
xbd\x02\xacf\xb6\xaa\x02\x889\x95\xac6Q\x80\xa4<1\xcd\xef\xf7R\xc2\xb2<j\x08&6\xa8.s\x16M!i\xa8#\xe7RM$\x15\x00\x84\x81 ... x00\x00P\x1d\x01\x04\x00\x00\x00\x00\x00\xa8\x8e\x00\x02\x00\x00\x00\x00\x00T\xe7\xff\x03a\xbc\xbee\x93\xf6V\xfc\x00\x00\x00\x00IEND\xaeB`\x82' |
encoded_image = base64.b64encode(data).decode("utf-8") will encode the bytes of the image file stored inside the data variable using the utf-8 encoding into a string and the encoded string will be stored inside the encoded_image variable. Now, if we examine the encoded string, they will all appear to be random characters and resemble the following.
|
1 2 3 |
+jYs7u5Zhy29PmXSh8aQtPim5Y4rC0OKzTQj5RYpzj2IBBCw3a7A0nEMRI1IbLj+uYSjUq/60lOuN3uaNuWvu85WK/RlHj67JyuW/H04oL16hCdtjvx6PFTD ... I4AAAAAAAADVEUAAAAAAAIDqCCAAAAAAAEB1BBAAAAAAAKA6AggAAAAAAFAdAQQAAAAAAKiOAAIAAAAAAFTn/wNhvL5lk/ZW/AAAAABJRU5ErkJggg== |
Then we returned the dynamic.html file and passed the variable encoded_image as a value of the key "img".
Writing template
dynamic.html file
|
1 2 3 4 5 6 7 8 9 10 11 12 13 14 15 16 17 18 19 20 |
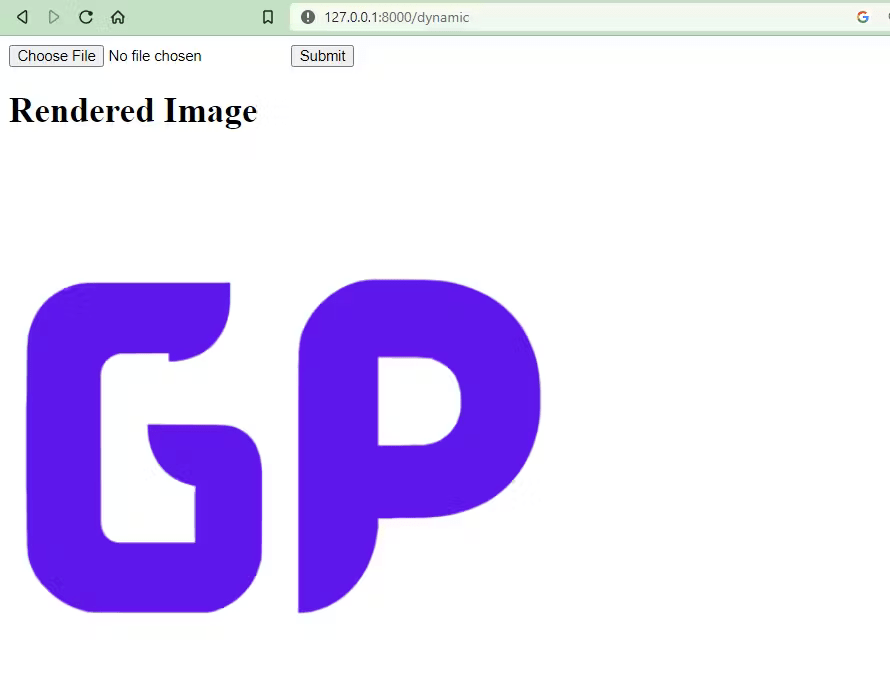
<html> <head> <title>Rendering Dynamic Images Using FastAPI</title> </head> <body> <form action="/dynamic" enctype="multipart/form-data" method="POST"> <input name="file" type="file" /> <input type="submit" /> </form> {% if img %} <h1>Rendered Image</h1> <img src="data:image/jpeg;base64,{{ img }}" /> {% else %} <h1>Image will be render here...</h1> {% endif %} </body> </html> |
In our dynamic.html file, we added a form tag that handles a POST request from the "/dynamic" URL, and we used the enctype attribute with the value "multipart/form-data" to handle file uploading through the form. Then, within the form, we added two input tags: one for selecting the image and one for submitting it.
Then we used Jinja syntax to create an if-else condition and inserted an img tag with a src attribute containing our image. We passed "data:image/jpeg;base64, img" because we need to use this format to display base64 images in HTML.
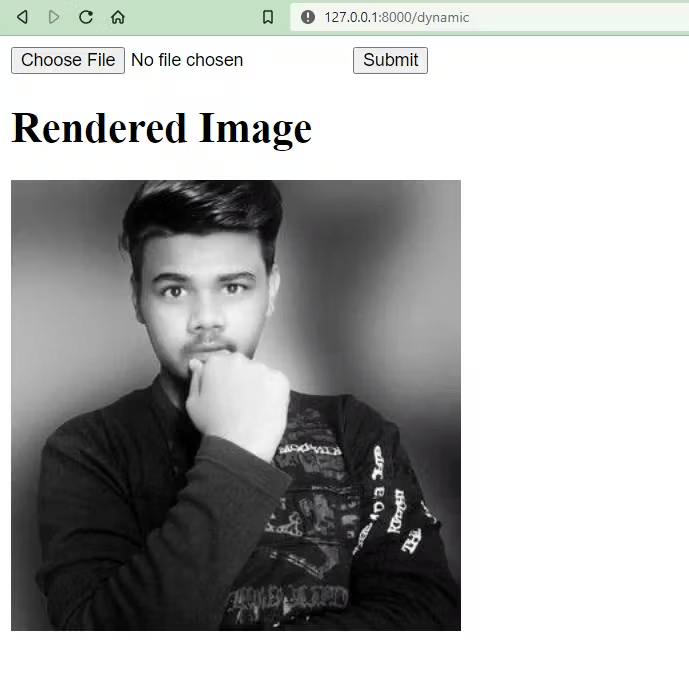
Testing API
Go to the URL 127.0.0.1:8000.
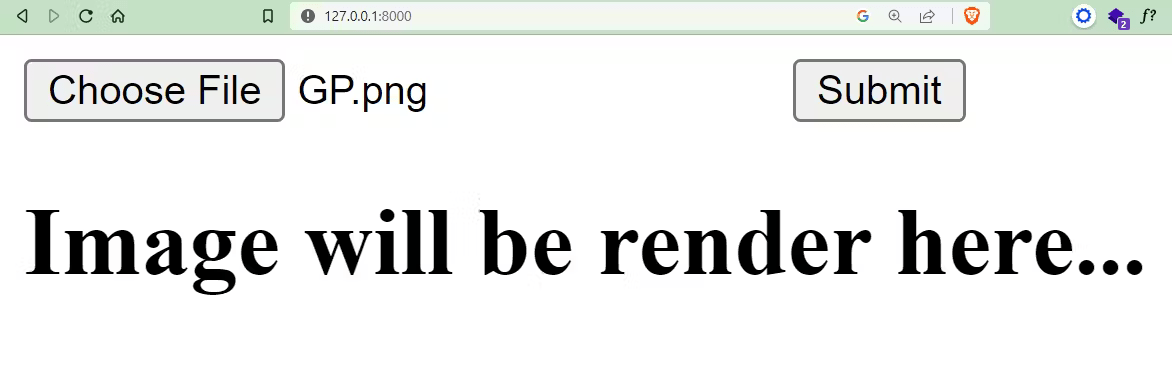
We chose the image that will be displayed. The image will be displayed if we click the submit button.
What if we want to save the user-provided image in a particular folder?
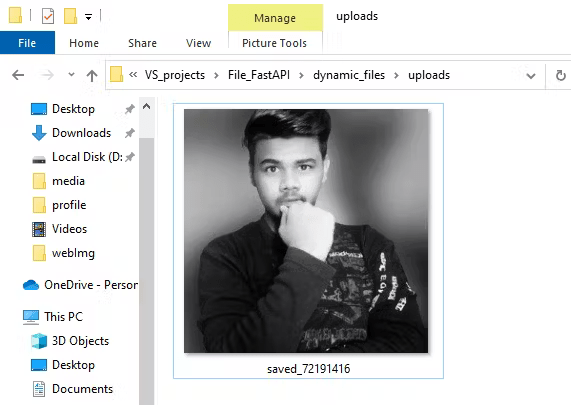
Saving user-provided images
To save user-provided images in a specific folder, assume we have a folder called uploads and want to save the images there.
|
1 2 3 4 5 6 7 8 9 10 11 12 13 14 15 16 17 18 19 20 21 22 23 24 25 26 |
# dynamic.py from fastapi import FastAPI, UploadFile, File, Request from fastapi.templating import Jinja2Templates import base64 app = FastAPI() templates = Jinja2Templates(directory="templates") @app.get("/") def dynamic_file(request: Request): return templates.TemplateResponse("dynamic.html", {"request": request}) @app.post("/dynamic") def dynamic(request: Request, file: UploadFile = File()): data = file.file.read() # Image will be saved in the uploads folder prefixed with uploaded_ with open("uploads/saved_" + file.filename, "wb") as f: f.write(data) file.file.close() # encoding and decoding the image bytes encoded_image = base64.b64encode(data).decode("utf-8") return templates.TemplateResponse( "dynamic.html", {"request": request, "img": encoded_image}) |
We used the open() function and passed the path to our uploads folder with the name we want to prefix with the name of the image and opened it in write mode and then used f.write(data) to create an image within the uploads folder with the name saved_xyz.png.
Testing
Run the server using uvicorn dynamic:app --reload and go to the URL 127.0.0.1:8000.

Conclusion
If you have worked with the Flask web framework, you may find it similar. FastAPI is a modern, high-performance web framework for building APIs using Python.
In this article, we’ve learned to display the static and user-provided(dynamic) images on the frontend using certain classes and modules from FastAPI. We saw two approaches for displaying static files on the frontend using FastAPI and then saw the process for displaying user-provided images and then the process for saving them in a particular folder.
Through this, we came across responses in FastAPI, requesting files, reading and uploading files, jinja templates, and handling static files.
🏆Other articles you might be interested in if you liked this one
✅Display static and dynamic images on the frontend using Flask.
✅Get started with FastAPI – A beginner guide.
✅Build your first command line interface using Python.
✅Learn how to execute the dynamically generated code using Python.
✅Public, Protected and Private access modifiers in Python.
✅Perform high-level file operation using shutil in Python.
✅Extract information from the web pages using Python and BeautifulSoup.
That’s all for now
Keep Coding✌✌


