
API (Application Programming Interface) is a medium that helps two applications talk to each other. APIs have some set of functions that allows only the asked data from the server requested by the application as a response.
If we put it in simple words, the API takes the request from the application and sends that data to the server. The server processes that data and sends the response back to the application and then the application interprets the data and presents it to the user.
What is FastAPI?
FastAPI is a modern, high-performance web framework for building Python REST (Representational State Transfer) APIs. FastAPI is written in Python and is based on Pydantic and type hints (tells the type of variables or functions/methods) to validate the data.
FastAPI offers excellent performance and support while building APIs and it has several key features that let us carry out operations smoothly:
- Fast: Provides high-performance
- Code rapidly: Increase the speed to develop features.
- Easy: It is designed to be easy to use and learn.
- Robust: Get production-ready code. With automatic interactive documentation.
- Adaptable: Works well with the open standards for APIs like OpenAPI and JSON Schema.
- Type hints: Makes it easy for data validation.
- Supports asynchronous: It fully supports asynchronous programming. (Source)
FastAPI applications can run on both WSGI (Web Server Gateway Interface) and ASGI (Asynchronous Server Gateway Interface) HTTP servers. It primarily uses the ASGI standard which is a spiritual successor to the WSGI.
Another interesting feature FastAPI provides is that it automatically auto-generates the interactive API documentation using the Swagger UI and ReDoc.
In this tutorial, we will learn the concepts of FastAPI and implement them while building a simple web API.
Install FastAPI
Before proceeding further in this tutorial, it’s a good idea to create an isolated environment where we can install the dependencies required to get started.
We will start by installing the FastAPI using the pip. Remember you must be on Python version 3.7 or above.
|
1 |
(project_fastapi) PS> pip install "fastapi[standard]" |
With that, FastAPI will be installed in our virtual environment and will be ready to use to create the API.
Note: In the above command, “project_fastapi” is the name of the virtual environment created behind the scenes and we activated it and installed the required dependencies. If you run the command “pip freeze“, you’ll see the list of dependencies installed in your virtual environment.
A Basic API
The following code shows the basic API created using FastAPI.
|
1 2 3 4 5 6 7 8 |
# api.py from fastapi import FastAPI app = FastAPI() @app.get("/") def data(): return {"message": "Hello, I am a simple API."} |
In the above code, we imported the class FastAPI from the fastapi module and then created an instance called app of the class FastAPI.
Next, we created a path operation decorator that will tell the FastAPI that the function below is responsible for handling the requests given to the path ("/") using the “get” operation.
Then we defined the path operation function that will return the response whenever the request comes to the specified URL ("/") using a GET operation.
We can make our path operation function asynchronous using the async keyword.
|
1 2 3 4 5 6 7 |
from fastapi import FastAPI app = FastAPI() @app.get("/") async def data(): return {"message": "Hello, I am a simple API."} |
Now we can run our application using fastapi dev.
|
1 |
(project_fastapi) PS> fastapi dev api.py |
Here, fastapi dev api.py will start the development server with the Python file api.py which contains the API code.
We’ll be prompted with the following message.
|
1 2 3 4 5 6 7 8 9 10 11 12 13 14 15 16 17 18 |
╭────────── FastAPI CLI - Development mode ───────────╮ │ │ │ Serving at: http://127.0.0.1:8000 │ │ │ │ API docs: http://127.0.0.1:8000/docs │ │ │ │ Running in development mode, for production use: │ │ │ │ fastapi run │ │ │ ╰─────────────────────────────────────────────────────╯ INFO: Will watch for changes in these directories: ['D:\\SACHIN\\VS_projects\\api'] INFO: Uvicorn running on http://127.0.0.1:8000 (Press CTRL+C to quit) INFO: Started reloader process [12048] using WatchFiles INFO: Started server process [2480] INFO: Waiting for application startup. INFO: Application startup complete. |
And if we’ll go to http://127.0.0.1:8000, we’ll see the response shown in the image below.

Learn by building API
Upto here, you might have understood the basic concepts of FastAPI. Now we’ll understand even more concepts while building an API that will extract the hyperlinks from the specified URL.
Before start building the API, we must install the following libraries that will be required in the process.
- BeautifulSoup4
- Requests
We can install these libraries in our virtual environment by running the following command using pip.
|
1 |
(project_fastapi) PS> pip install beautifulsoup4 requests |
These libraries will help us extract the content of the particular URL and here’s the guide to scraping the webpage using beautifulsoup.
LinkEx API
Here is a simple API that extracts all the hyperlinks from the URL.
|
1 2 3 4 5 6 7 8 9 10 11 12 13 14 15 16 17 18 19 20 21 22 23 24 25 26 27 28 29 30 31 32 |
# Imported required libs from fastapi import FastAPI from pydantic import BaseModel from bs4 import BeautifulSoup import requests import re # FastAPI Instance app = FastAPI( title="Linkex", description="An API to extract the hyperlinks from the URLs." ) # Data Model class Data(BaseModel): urls: str # Simple route @app.get("/", tags=["Simple Route"]) def get_data(): return {"message": "Hello, I am a Linkex API."} # Link extracting route @app.post("/", tags=["Extract Links"]) def extract_result(route: Data): r = requests.get(route.urls) htmlContent = r.content soup = BeautifulSoup(htmlContent, 'html.parser') anchors = [link.get("href") for link in soup.find_all( "a", attrs={'href': re.compile("https://")})] return {"Data": anchors} |
First, we imported the required libraries used in the code.
Then we created an instance of the FastAPI and this time we declared two arguments called title and description which will set the title and the description of the API.

Then we created a simple route or path operation decorator (@app.get("/", tags=["Simple Route"]). Here @app is the decorator instance of the FastAPI and get is the operation that will tell the route to perform a GET operation when the request comes from the ("/") route. We also declared the tags argument (takes a list) to name the API route.
Right below the path operation decorator, we defined a path operation function that handles the logic when the specific endpoint is hit.

If we hit the ("/") route, we’ll see the response shown in the image below.

Another route we defined is the main route that handles the POST request and extracts the hyperlinks from the URL specified in the request body.
As usual, we created a path operation decorator “@app.post("/", tags=["Extract Links"])” and this time the operation is post to perform the POST request.
Then we created a path operation function called extract_result and passed the argument route and the type of argument declared is a Pydantic model called Data.
|
1 2 3 4 5 |
from pydantic import BaseModel # Data Model class Data(BaseModel): urls: str |
To create the Pydantic model, we imported the BaseModel from pydantic and then created a schema for our model by defining a Data class that extends the BaseModel and declared the argument urls which is of type string.
Then we wrote the logic that extracts the links prefixed with https:// and displays them from the URL specified in the request body of the API.
Testing LinkEx API
Now our API is ready and the next step is to test it to see if it really works and send us the response that we expect from it.
Run the API code and go to http://127.0.0.1:8000/docs to see the interactive documentation of our LinkEx API powered by Swagger UI.
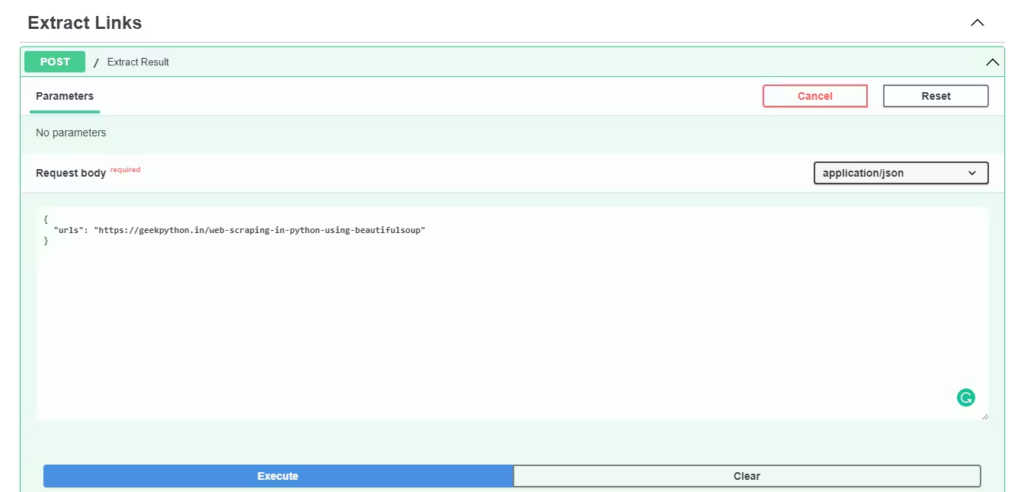
We specified the URL in the request body of the API and then we sent the request to the API by clicking on the “Execute” button.

Our API successfully extracted the hyperlinks from the URL and displayed them in the response body of our API.
Path parameter or variable
We can declare the path parameters or variables by using curly braces like we used to do for formatted strings.
|
1 2 3 |
@app.get("/{param}") def get_data(param: str): return {"message": param} |
If we execute http://127.0.0.1:8000/Hello%20World, we’ll get the response “Hello World” because the value of the parameter is passed inside the function as the argument param.
Data validation
If we’ll change the argument param from type str to type int in the above code, and try to pass the value as a string, we’ll get an easily readable error.
|
1 2 3 |
@app.get("/{param}") def get_data(param: int): return {"message": param} |

If we try in the API documentation and try to execute it then we’ll be warned with a message on data validation.

Conclusion
In this tutorial, you were introduced to the most basic concepts of FastAPI that will help you get started with FastAPI and build basic web APIs using FastAPI and Python.
We also coded a basic API that extracts the hyperlinks from the specified URL and was able to understand every block of code.
🏆Other articles you might like if you liked this article
✅Build a custom deep learning model using the transfer learning technique.
✅Implement deep learning model into Flask app for image recognition.
✅Argmax function in TensorFlow and NumPy.
✅Build a Covid-19 EDA and Visualization app using streamlit in Python.
✅Deploy your streamlit app on Heroku servers in a few steps.
✅Powerful one-liners in Python to enhance code quality.
That’s all for now
Keep Coding✌✌


