

Introduction
Databases are used to store and manage large amounts of data in an efficient and organized manner. Databases are used in scientific research, financial analysis, and many other fields to store and analyze data. They are an essential tool for organizing and managing data in a way that is easily accessible and usable.
PostgreSQL is an open-source object-relational database management system. It is widely used for managing and storing large amounts of data and is known for its reliability, flexibility, and performance.
In this article, you’ll learn to connect the PostgreSQL database with Python.
Pre-requisite
In order to work with a PostgreSQL database and perform various operations on the data stored in the database, it is necessary to have a basic understanding of Structured Query Language (SQL). With a basic knowledge of SQL, you can create tables, insert and retrieve data, update and delete data, and perform other operations on the data stored in the database.
PostgreSQL and Python
PostgreSQL and Python can be used together in several ways. For example, you can use Python to connect to a PostgreSQL database and perform various operations on the data stored in the database, such as inserting, updating, or deleting data. You can also use Python to retrieve data from the database and perform analysis or other operations on the data.
To use PostgreSQL with Python, you must install a library such as psycopg2, which provides a Python interface to the PostgreSQL database.
Psycopg2 lib
psycopg2 is a popular Python library for working with PostgreSQL databases. It is a PostgreSQL adapter for Python that provides a Python interface to the PostgreSQL database.
With psycopg2, you can connect to a PostgreSQL database and perform various operations on the data stored in the database, such as inserting, updating, or deleting data. You can also use psycopg2 to retrieve data from the database and perform analysis or other operations on the data.
To install the psycopg2 library, you will need to use a package manager like pip. Open a terminal or command prompt window and type the following command:
|
1 |
pip install psycopg2 |
This will install the psycopg2 library and all of its dependencies.
Installing pgAdmin4
pgAdmin4 is the latest version of pgAdmin, a popular web-based graphical tool for managing and developing PostgreSQL databases. It provides a user-friendly interface that allows you to create and modify databases, tables, views, and stored procedures, run SQL queries and scripts, and manage users and permissions.
However, you can download and install the pgAdmin4 app for Windows and several other options are also available for different platforms.
To use pgAdmin4, you will need to install it on your machine and then launch it from the start menu or desktop shortcut. When the application opens, you will be presented with a login screen where you can enter your credentials to connect to a PostgreSQL server. Once you are connected to the server, you can use the pgAdmin interface to manage and develop your databases.
Creating databases and tables in pgAdmin4
To create a database and table using the pgAdmin4 app, you can follow these steps:
- Launch the pgAdmin4 app and connect to a PostgreSQL server by entering your credentials in the login screen.
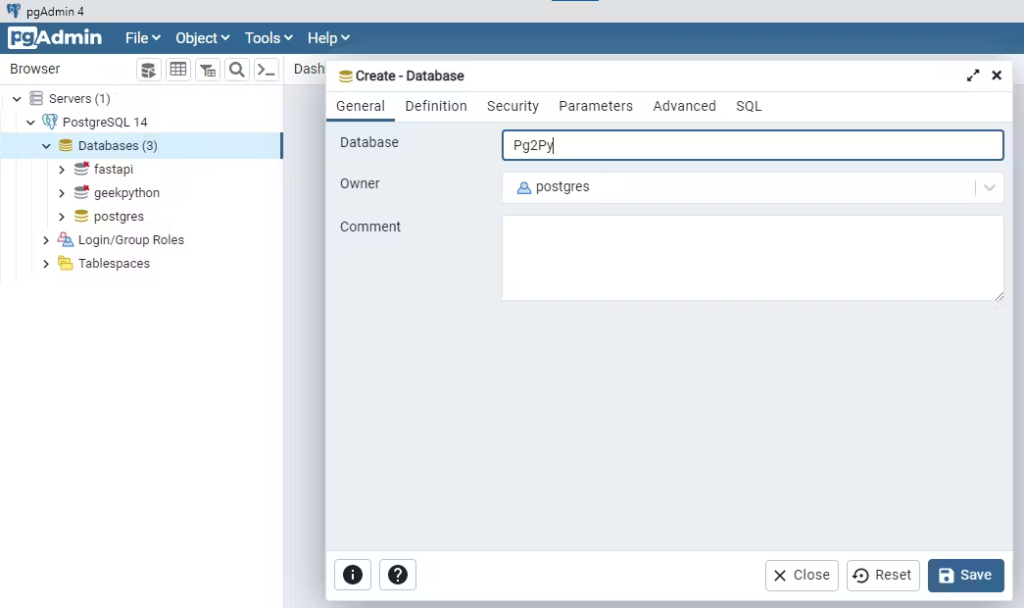
- In the object tree on the left side of the pgAdmin4 window, right-click on the “Databases” node and then hover on the “Create” button and select “Database…“. In the “Database” dialog, enter a name for your database and click “Save“.
- To create a table within the database you just created, right-click on the database in the object tree and select “Query Tool“. This will open a new query window where you can enter SQL commands to create tables.
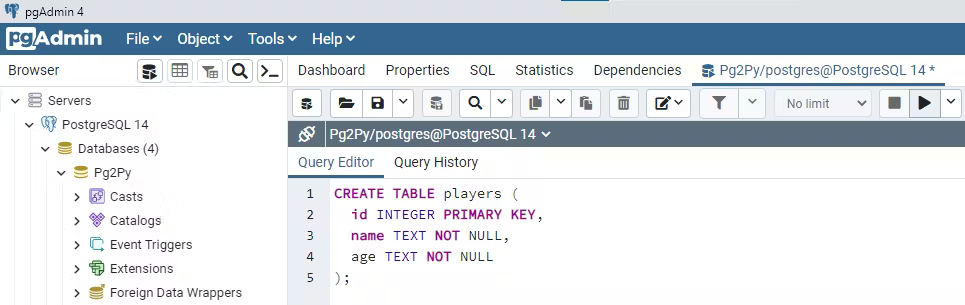
- In the query window, enter the SQL command to create a table. For example, you can use the following SQL command to create a simple table called “players” with three columns:
|
1 2 3 4 5 |
CREATE TABLE players ( id INTEGER PRIMARY KEY, name TEXT NOT NULL, age TEXT NOT NULL ); |
- Click the “Execute” button in the query window to execute the SQL command and create the table.
- To view the table you just created, expand the database node in the object tree, expand the “Schemas” node, and click on the “Tables” node. The table you created should be listed under the “Tables” node. You can double-click on the table to view its contents and structure.
Now your table is ready and the next part is to connect this database with Python and manipulate the data inside the table that was just created.
Connecting database with Python
To connect the PostgreSQL database with Python, you will need the psycopg2 library installed at the beginning of the article.
Open your favourite code editor and create a directory and then create a database.py file inside it and write the code for connecting the database using the psycopg2 library.
|
1 2 3 4 5 6 7 8 9 10 11 12 13 14 15 16 17 |
import psycopg2 as pg try: conn = pg.connect( host='localhost', database='Pg2Py', port=5432, user='postgres', password='*********' ) cursor = conn.cursor() print("Connection established.") except Exception as err: print("Something went wrong.") print(err) |
In the code above, psycopg2.connect() function establishes a connection to the database using the specified configurations like host, database, port, user, and password. The cursor() will allow interaction with the database.
The above code will try to connect with the database and if it is connected successfully then it’ll prompt a message saying “Connection established” otherwise it’ll prompt an error message with the error.
Fetching data from the database
The connection to the PostgreSQL database is now established with the help of Python and the psycopg2 library.
Here is an example of fetching the data present inside the table in the database.
|
1 2 3 4 5 6 7 8 |
def fetch_data(): cursor.execute('''SELECT * FROM players''') data = cursor.fetchall() return data details = fetch_data() for row in details: print(row) |
In the above code, the cursor.execute() function executes the SQL query to select all the data from the table “players” and cursor.fetchall() fetches the data and stores it inside the data variable.
In the next block of code, the data has been displayed by calling the fetch_data function.
|
1 2 |
(2, 'Rohit Sharma', '34') (1, 'Virat Kohli', '33') |
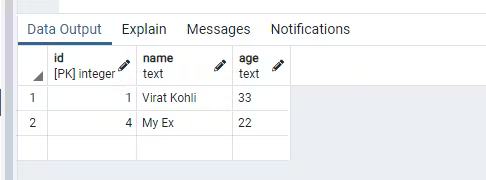
The above data fetched from the Pg2Py database was added manually in the table from the pgAdmin4 app.
Creating an entry in the database
The data can be added to the database using Python. The process is very simple, you just need to execute the SQL query to insert the data.
To insert the data into the database write the following code:
|
1 2 3 4 5 6 7 8 9 10 |
def create_entry(): cursor.execute('''INSERT INTO players (id, name, age) VALUES (%s, %s, %s)''', (4, 'My Ex', 22)) add_data = cursor.fetchone() conn.commit() return add_data data = create_entry() print(data) |
The create_entry() function contains the cursor.execute() function that executes the SQL query to insert the data into the “players” table. Here, the simple SQL statement “INSERT INTO” used will insert the values specified after the “VALUES” statement.
The %s placeholders used in the above code are good practices when adding data or updating specific data. This will help you when your data is coming dynamically into your database.
The cursor.fetchone() function was used to get the added data and this time the commit() function was used to commit the changes to the database. After committing the changes, the data was displayed.
|
1 |
(4, 'My Ex', '22') |
The above code added the data into the “players” table and it can be seen easily in the pgAdmin4 app. Run the SQL query SELECT * FROM players; in the query tool of the “players” table.

Deleting an entry from the database
You can perform a deletion action to delete the specific entry in your database. To delete the specific data, you will need to use the conditional statement in the SQL query. Suppose you want to delete the player name “Lionel Messi” from the database, then you will need to use the condition where you will specify that this specific name has to delete.
Here’s how you can perform the action using the code:
|
1 2 3 4 5 6 7 8 |
def delete_entry(): cursor.execute('''DELETE FROM players WHERE name = %s''', ("Rohit Sharma",)) conn.commit() return 'Data deleted successfully' data = delete_entry() print(data) |
In the above code, the “DELETE FROM” statement has been used with the “WHERE” clause that will delete the entry from the database with a name equal to the player name “Rohit Sharma“.
Similarly, you can use other column names from the table to delete an entry from the database. Most developers prefer using the column name that contains unique values in the table.
The value for the WHERE clause is passed as a tuple to the cursor.execute() because it accepts only tuple value. If you will try to pass a value other than the tuple it’ll throw you an error.
Finally, the changes were committed to the database using the conn.commit() method.
|
1 |
Data deleted successfully |
You can see the entry in the database has been deleted.
Updating an entry
The most integral part of any application is to update its existing data and of course, that updated data has to be reflected in the database. As usual, you need to run the SQL query for updating the specific entry.
Here’s the Python code for updating the entry in the database.
|
1 2 3 4 5 6 7 8 9 |
def update_entry(): cursor.execute('''UPDATE players SET name = %s, age = %s WHERE id = %s''', ('My other ex', 21, 2)) conn.commit() return 'Updated successfully' data = update_entry() print(data) |
In the above code, a SQL query is executed using the execute() method in which the “UPDATE” statement is used to update the “players” table and the “SET” statement is used to set the updated values to the existing data. The “WHERE” clause is used to specify the ID of the data to be updated.
And then the changes were committed to the database using the commit() method.
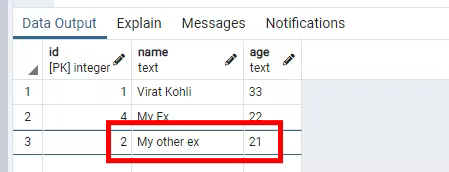
The existing data with an ID of 2 is now updated with the specified data in the Python code and is successfully reflected in the database. You might be thinking that there was no data with an ID equal to 2 before. Data with an ID equal to 2 was manually added before updating the existing data.
Conclusion
The article focuses on connecting the PostgreSQL database with Python using the PostgreSQL database adapter library called psycopg2. However, the complete process was not executed using Python code. Fetching, creating, deleting, and inserting operations were executed with the help of SQL queries in Python.
There are popular ORMs (Object Relation Mapper) available that make the complete operations done using only Python code.
But this article has a mix of both Python and SQL to integrate the PostgreSQL database with Python to perform operations like updating, creating, inserting, and much more into the database by running the Python code.
Let’s recall what you’ve learned:
- Connecting the PostgreSQL database with Python
- Fetching the data from the database
- Creating the entry into the database
- Deleting the entry from the database
- Updating the existing entry in the database
This will help you create a connection between the database and Python.
🏆Other articles you might like
✅Create a dynamic contact form having a database and Gmail connected with it.
✅Build a custom deep learning model using transfer learning.
✅Display dynamic and static images on the frontend using Flask.
✅Build your first command line interface using Python.
✅NumPy and Tensorflow have a common function.
✅Get the maximum value from an array using NumPy.
That’s all for now
Keep Coding✌✌

